
Record Anything on Your Mac with AldooSnap Video
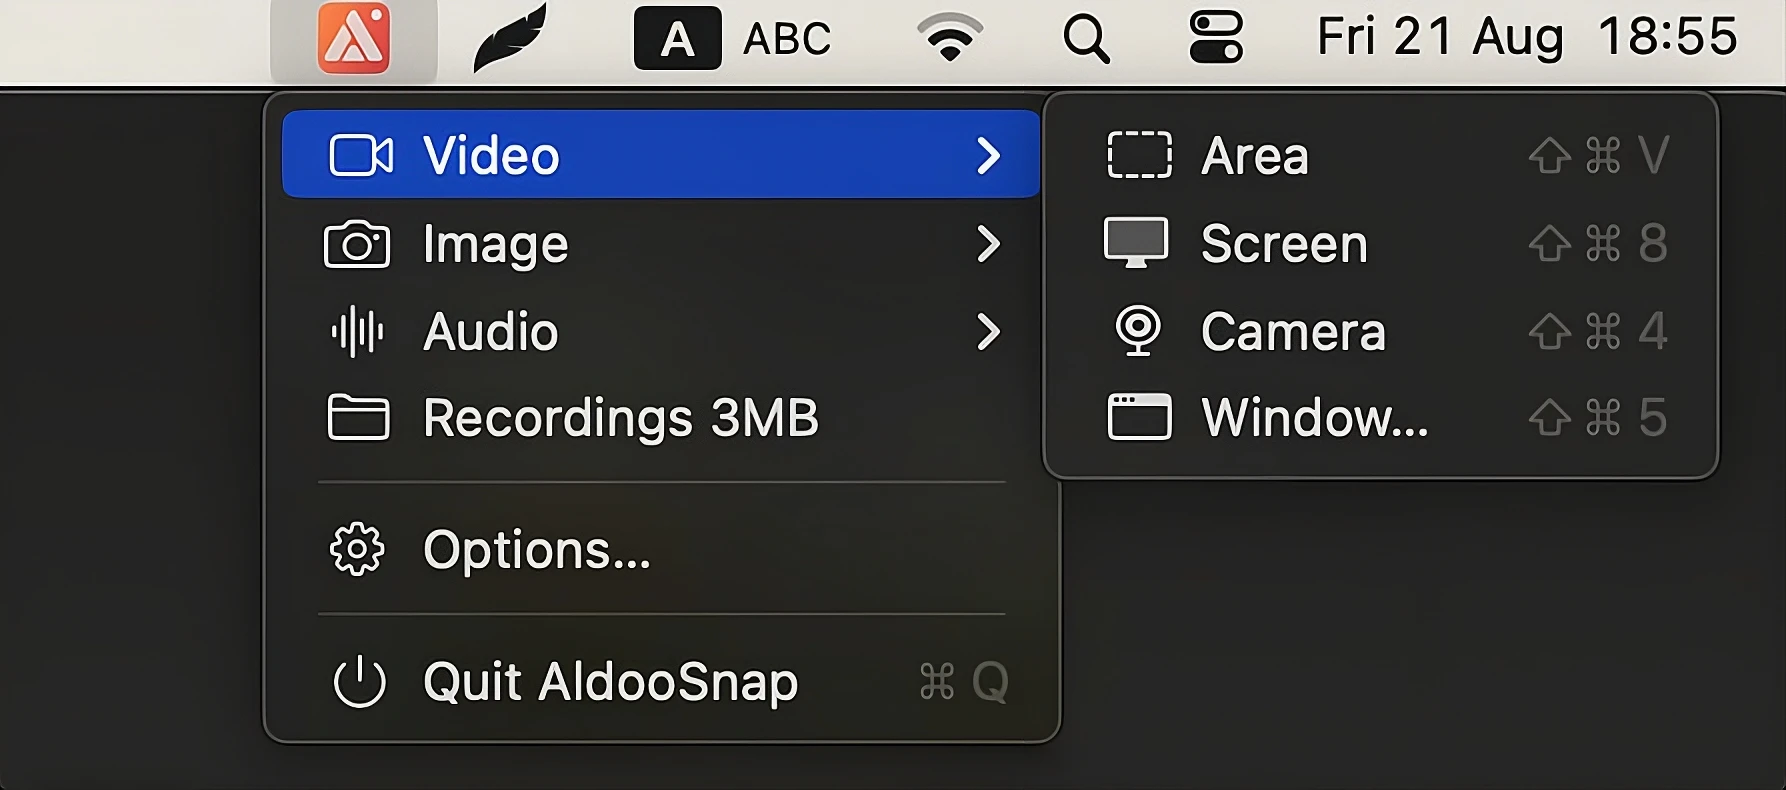
AldooSnap records video four ways: a custom area, the whole screen, your camera, or a single app window. Every mode lives under the same menu bar icon, in the Video submenu, and every recording ends up in the same Recordings folder when you stop.
Note: The default Recordings folder is in the ~/Movies/AldooSnap directory of your Mac. You can change that anytime from the app's Options menu.
Record an Area
Use this when you only need a piece of the screen — a form, a chat window, a corner of your app.
- Click the AldooSnap icon in the menu bar.
- Choose Video → Area.
- The screen freezes. Drag to draw the rectangle you want to capture.
- Adjust the selection handles if you need to resize or reposition the rectangle.
- To lock the selection to a specific ratio, open the Aspect Ratio & Size tool in the selection bar and pick a preset (Free, 16:9, 4:3, 1:1, 9:16, or 21:9).
- Press the record button in the selection bar (or hit Return). Recording starts immediately — no separate "Start" step.
- Use the floating pill controls to manage the recording: Stop to end it, Copy Link to stop and copy a share link, or the Camera button to toggle a picture-in-picture webcam bubble on top of the capture.
- Drag the pill's handle to move the recording rectangle while capturing, if you need to follow content around the screen.
- Click Stop when done. The video is saved automatically.
Record the Screen
Captures an entire display, cursor and all — good for full walkthroughs or demos.
- Click the AldooSnap icon in the menu bar.
- Choose Video → Screen.
- The first time, grant macOS's screen recording permission if prompted.
- A border appears around the active display along with a Start Recording button and a small options bar.
- Before starting, use the options bar to toggle Camera (webcam bubble), Audio (choose Microphone and/or System Audio), and Pointer (show/hide the mouse cursor). Close cancels without recording.
- Click Start Recording.
- A floating pill with a timer appears. Use Stop to end the recording or Copy Link to stop and copy a share link; the Camera button toggles the webcam bubble mid-recording.
- Click Stop to finish. The video is saved automatically.
Record a Window
Captures a single app window, even if other windows overlap it.
- Click the AldooSnap icon in the menu bar.
- Choose Video → Window….
- Pick the window you want from the picker showing all open app windows.
- AldooSnap brings the chosen window to the front automatically.
- A border appears around the window with a Start Recording button and the same Camera, Audio, and Pointer options as screen recording.
- Click Start Recording.
- Use the floating pill's Stop or Copy Link button — it sits at the bottom-right of the recorded window — to end the recording. The window frame stays fixed during recording, so there's no need to reposition it.
Trim and Export Your Recording
Stop an Area, Screen, or Window recording and AldooSnap opens the finished clip automatically in a result window with inline playback and a toolbar in the bottom-right corner:
- Trim (scissors icon) — drag the in and out handles on the scrubber to cut the clip down to the part you need.
- Copy share link (link icon) — uploads the clip and copies a share link. If you've trimmed it first, the trimmed range is what gets uploaded.
- GIF — copies a share link to a GIF version of the clip (capped at 30 seconds, 15fps, 640px wide).
- Save (download icon) — exports the file and reveals it in Finder.
- Close (X) — dismisses the window.
Trimming doesn't re-encode anything by itself — whichever button you click next (Save, Copy share link, or GIF) is what applies the trim.
Record from the Camera
A standalone webcam recording, no screen capture involved — useful for talking-head clips.
- Click the AldooSnap icon in the menu bar.
- Choose Video → Camera.
- A dialog opens with a live camera preview.
- Click the record button to start. It's an icon-only toggle — a record icon that switches to a stop icon once you're recording — and a duration timer starts alongside it.
- Click Copy Link at any point after starting to grab a share link for the recording.
- Click the button again to stop (recordings also auto-stop at the 2-hour limit).
- The dialog switches to playback, where you can click Copy share link, Save to export the file, or Close to dismiss.
Finding Your Recordings
Every video mode saves to the same place. Click the AldooSnap icon in the menu bar and choose Recordings to open the folder directly in Finder. If a recording is still in progress, the menu also shows a Stop Recording item so you can end it without hunting for the floating controls.
The default Recordings folder is in the ~/Movies/AldooSnap directory of your Mac.
You can change that anytime from the app's
Options menu.